If your question is not answered, don’t hesitate to contact us.
Video tutorials
Accounts and Getting Started
- How do I sign in?
- How do I know my account’s name?
- Help! I forgot my password!
- What if I forgot my domain name (account name)?
- How do I add a channel?
- Is my IMAP server compatible with Charm?
- How do I add a new team member?
- Can I get my incoming messages as an RSS feed?
- How do I add a signature to my emails?
- How do I add a new credit card my account?
- How do I view past invoices?
- How do I cancel my account?
Adding the feedback tab to your app or site
- How to add the Charm feedback tab to your site or app?
- How do I provide an email and a customer value to the feedback tab?
- How can I customize labels or offer the feedback form in a different language?
- How can I change the appearance of the feedback tab and/or popup?
- How can I open the feedback form with JavaScript?
The Process tab
- How do I select a channel to view?
- How do I search or filter my messages?
- What’s that ignore & archive button do?
- How would I categorize an email, and why is this useful?
- This email needs more work, how do I create a case?
The Work tab
The Cases tab
- How do I create a new case from the Cases tab?
- How do I add team members, notes, files and to-do’s to a case?
- Can I search or filter cases? By channel, case type, or team member?
Accounts and Getting Started
How do I sign in?
When you first set up Charm, you chose a unique account name. To log in, just go to this URL for example:
https://MostAwesomeCompany.charmhq.com
You would just swap in “Most Awesome Company” for your own account’s name.
How do I know my account’s name?
Whether you are the account owner who chose the name or not, you should have an email in your archives from Charm with your account URL. The email is from the Charm Team and has a subject line “Charm Welcomes you!”
Help! I forgot my password!
No problem! Reset your password by going to your Charm sign-in page, located at:
https://YOURACCOUNTNAME.charmhq.com/
And click the “Password Recovery” tab on the bottom right.
What if I forgot my domain name (account name)?
Refer to your welcome email, with the subject line of either Charm welcomes you! (if you created the account) or You’re invited to Charm! (if you were brought onto an existing account).
Still can’t find it? Send us an email with your name & any other information that could help us locate your account.
How do I add a channel?
→ Watch a video tutorial on getting started with Charm
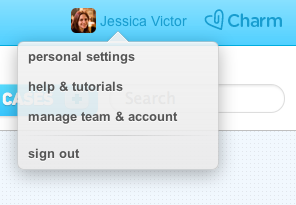
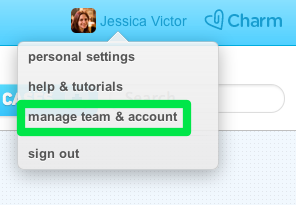
Note that you HAVE to be the account owner in order to add a channel! As the account owner, click on your name in the top right hand corner,
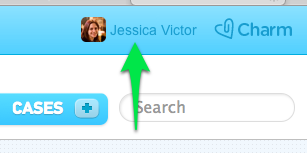
and then on Manage Team and Account.
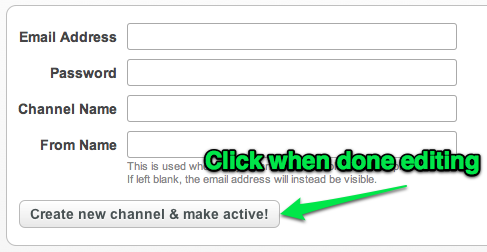
Next, select the Channels tab, and the Add New Channel button

Here you can add the email address and password of the channel. If it is a Gmail account, Charm will do all of the work for you, but if now you will need to have your server details handy! We recommend naming your channel something simple, like the name of your product. The From name will be displayed in the recipient’s inbox, if left blank it will default to the email address.
Is my IMAP server compatible with Charm?
Charm works great with any email server that implements the IMAP standard,
more specifically IMAP4rev1. Notably, Google Mail and Google Apps Mail
are 100% supported.
- Google Mail
- Google Apps Mail
- Most other IMAP mail servers!
The following products don’t (fully) implement the IMAP standard (RFC2060 IMAP4rev1)
and/or we’ve had problems with fetching emails from them, so at this time they’re not
officially supported by Charm (we are working to support them in the future).
- Kerio Connect 7
- SmarterMail Enterprise Edition 7.1
- GoDaddy IMAP
If you have trouble with your specific IMAP server (e.g. emails aren’t fetched), please
let us know as much as you can about your specific server software and what the issues is,
so we can add them to our “IMAP Servers to support in the future case” (yes, we use Charm ourselves).
How do I add a new team member?
Once again, you have to be the account owner in order to add new team members! Click on your name in the top right hand corner,
and then on Manage Team and Account.
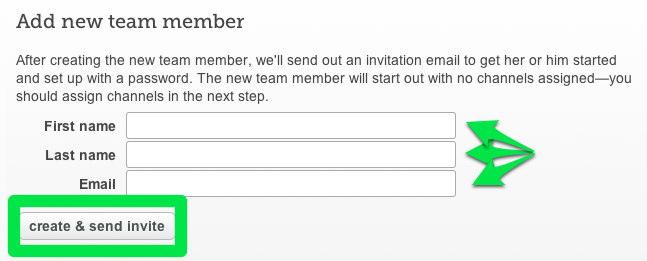
You should now be looking at the Team tab and click the Add New team member button

Just enter their first and last name, their email and click the create and send invite button. Easy as pie!
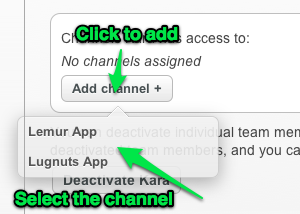
Then you can add the team member to the appropriate channels by clicking the Add channel + button, and picking the channels you want them to have access to.
Can I get my incoming messages as an RSS feed?
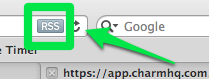
Yes you can! If you are using Safari, just click on the little RSS feed button up in the URL bar to set up your feed.
If you’re on Firefox, while you have Charm open and are logged in, click on Bookmarks and then Subscribe to this page. If you’re on Chrome, you need to download an extension from the Chrome Webstore.
How do I add a signature to my emails?
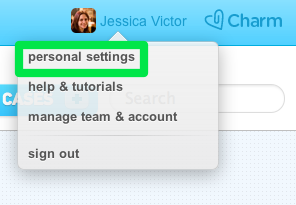
To add a signature to your emails, first click on your name in the upper right hand corner, and then on Personal Settings.
In the Personal tab you can set up a signature that will be automatically sent with every email you reply to. If you edit your name or email address, make sure to hit the save and close button!
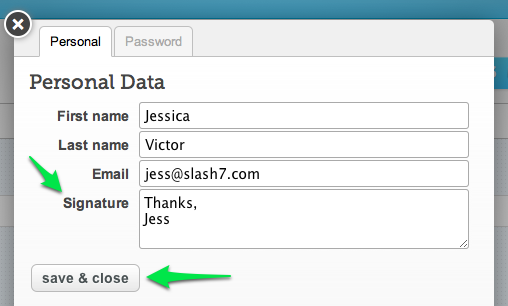
Note that the signature is plain text only, no HTML tags are allowed.
How do I add a new credit card my account?
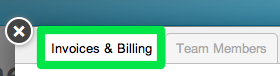
If you need to add a new credit card to your account, click on your name in the upper right hand corner, and then on Manage Team and Account, and select the Invoices and Billing tab.
Look under the Payment Method section and click on the add a credit card to your account button (or use a different card if you already have one linked to your account).

Here you can enter new credit card details, and click to save the card as your preferred payment method. Also note that if you have an outstanding invoice Charm will automatically attempt to charge the new credit card once you save the card’s details!
How do I view past invoices?
To view past invoices, click on your name in the upper right hand corner, and then on Manage Team and Account, and look at the Invoices and Billing tab.
In here there is a Past Invoices box with links to all available past invoices from your account. Just click on any of them to view your past Charm invoice.

How do I cancel my account?
If you are not feeling the Charm love, you can cancel your account at any time. To close your account click on your name in the upper right hand corner, and then on Manage Team and Account, and look at the Invoices and Billing tab.
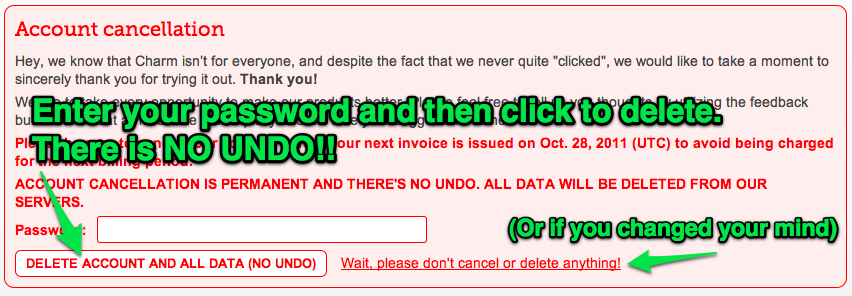
All the way at the bottom of this tab is a section called Account Cancellation.

We ask you to enter your password for security, and it is extremely important to note that once you agree to delete your account, we’ll delete all your data from our servers, for which there is NO UNDO.
How to add the Charm feedback tab to your site or app
It’s easy to add the Charm feedback box to your web site or app.
The main advantage of using the feedback snippet is that Charm can automatically
collect a lot of useful information to help you give better support:
- Browser and operating system versions of the user
- The local time and date of the user
- The current URL the user is sending the feedback from
To get started, just add the HTML snippet found in the “Channels & Mail accounts”
section (for the specific product channel). Note that each Charm channel has a different
“key”, by which it is identified to Charm.
Add this HTML snippet just before the closing </BODY> tag at the end of your page.
Example:
<script>
var __CHARM = { key: 'alotofcharactersandnumbers' };
</script>
<script src="https://secure.charmhq.com/feedback.js" async defer></script>
This code works in almost all circumstances, with 99.99% of
websites and apps, but you should test it on a development or staging
environment first, as it does add new HTML elements to your page in
order to be able to show the feedback box to your users.
Once you’ve included the snippet, users will see the blue “Feedback & Support” tab on the left side of your site or app.
In case you run into issues with the feedback tab or the feedback
popup not being shown correctly, please let us know immediately
at support@charmhq.com,
and be sure to include a screenshot and any other information that
might help us (e.g. a link to log in to your web app).
How do I provide an email and a customer value to the feedback tab?
By default, when users click the tab, it asks for their email and the feedback or question they have. You can provide additional data to the feedback snippet to make it even easier for the user (by not having to type in their email address), and to provide additional data about the user to charm. This works especially well for web apps, when the user is logged in.
While the “key” field is required, you can use any or all of these extra fields (all are optional):
- email Set the email address of the user.
(The “your email” field in the feedback popup will not be shown) - customer Name of the customer/company. For example,
in Charm itself we use the Charm subdomain for this. - customer_id A unique ID identifying the customer (not the person)
in your system. Multiple people can share the samecustomer_id,
so we can keep them neatly grouped together in Charm. - customer_info This string is shown when answering
emails coming from this person, or any people associated with
this person sharing the samecustomer_id.
If the string contains a dollar amount, like $50,
Charm assigns this to the customer internally, so you know which
emails are from paid customers, and how much cases are “worth”. - first_name The first name of a person writing in.
- last_name The last name of a person writing in.
Here’s a full example:
var __CHARM = {
  key: 'EXAMPLE',
  customer: "slash7",
  customer_id: 1,
  customer_info: "slash7.charmhq.com, AwesomePlan plan $49.0/mo, since 09/2011",
  first_name: "Thomas",
  last_name: "Fuchs",
  email: "thomas@fesch.at"
};
How can I customize labels or offer the feedback form in a different language?
In addition to these fields, you can also customize the button labels and messages, for example to translate it into an other language—it even comes with a simple templating language.
Just set one or more of the following properties in the __CHARM object:
- text The main text on top of the feedback popup (HTML tags are allowed).
- submit The label for the “Send feedback” button.
- cancel The label for the “hide this” link.
- your_email The label for the “Your email” field.
- your_comment The label for the “Your message” field.
- feedback_sending Shown when sending the message (HTML tags are allowed).
- feedback_sent Shown for 3 seconds when the messsage was successfully sent (HTML tags are allowed).
- feedback_error Shown when there was an exception sending the message (this should be exceedingly rare, and will only happen when the user’s internet connection drops out).
Here’s an example overriding some of the default settings and using some extra fields, and a template replacement (with “{first_name}”):
var __CHARM = {
  "text": "<b>Hi {first_name}! Do you have feedback or questions?</b><br/> Let us know and we'll get right back to you by email.",
  "key": "EXAMPLE",
  "last_name": "Fuchs",
  "customer_id": 6,
  "customer": "scriptaculous",
  "email": "thomas@fesch.at",
  "first_name": "Thomas"
};
How can I change the appearance of the feedback tab and/or popup?
You can adapt the looks of the feedback snippet and popup by using good old CSS with !important rules.
Here’s what we use in Freckle to change the background color of the feedback box. We also use a custom tab image:
#CHARM_TAB {
  background-image: url(../images/feedback-tab.png) !important;
}

#CHARM_BOX, #CHARM_MESSAGE {
  background:#ef5f92 !important;
  background:-webkit-gradient(linear, left top, left bottom, from(#f8679a), to(#ef5f92)) !important;
  background:-moz-linear-gradient(center bottom, #ef5f92 0%, #f8679a 100%) !important;
  text-shadow:1px 1px 0px #862d4c !important;
}

/* IE hax follow */
* html #CHARM_BOX, *+html #CHARM_BOX {
  background:#ef5f92 !important;
}
How can I open the feedback form with JavaScript?
You can programmatically open the feedback box like this:
<a href="mailto:youremail@example.com" onclick="__CHARM.show(); return false">Contact us!</a>Try it: Contact us!
The Process Tab
→ Watch a video tutorial on how to use the Process tab
How do I select a channel to view?
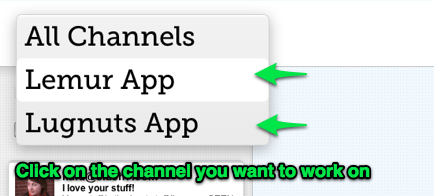
The Process tab defaults to an All Channels view, so you are looking at ALL of the messages in your system. To view just one of your channels, hover over the All Channels button and click on the channel you want to see.
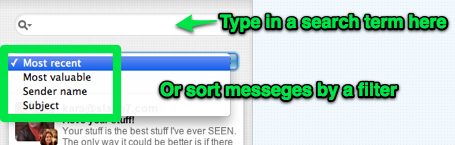
How do I search or filter my messages?
Right under the Channel filter is a search box, where you can search for a message by email address, subject, or any word in the message. Right under that is a way to sort your messages by Most Recent, Most Valuable, Sender name or Subject.
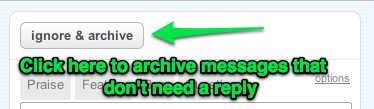
What’s that ignore & archive button do?
Sometimes an incoming message doesn’t require any work. Perhaps it was someone saying thank you, or an autoresponder. To remove a message from your inbox that you don’t need to think about, just hit the Ignore and Archive button. No replies will be sent out, but it will be in your archive in case you need to see it later.
How would I categorize an email, and why is this useful?
In the process box, there are four built in categories: Praise, Feature, Bug and Question. Just click on one to add a category to that email! The tab will turn from grey to blue so you know it’s selected.
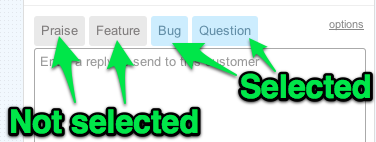
Categories are very useful so you can track what type of messages you are receiving. Additionally, if you need to make a case out of an email the category will carry over to that case. This will be super helpful when sorting and searching for a case.
This email needs more work, how do I create a case?
If an emails need more work, such as a bug or a feature request you can create a case for that email! This is a great way to get the email out of your inbox, and make sure that it gets the attention it needs. Once you have written your reply, and selected any categories that are appropriate, click on the Select or create a case box
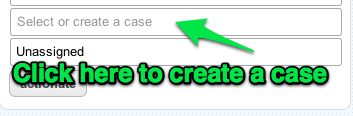
Once you have a few cases in Charm, they will appear as a drop down list when you type in a matching keyword (making it super easy to add an email to an already existing case!) Give the case a distinctive yet obvious name so you will recognize it when you later address that case. Now you can send a reply to the customer and create a case with one easy step! Once you send the email, you will be taken to the Cases tab so you can further edit your case. Check out the “Cases’ section for more details on editing a case.
The Work Tab
→ Watch a video introduction to the Work tab
What are “unhandled messages assigned to you”?
These are emails from the Process tab that you have been assigned to. Either you or a team member could have assigned you to that email. This is a way to keep track of the messages that are waiting for your expertise! Click on any of these messages get a closer look at it in the Process tab.
Where did my Todo’s come from?
Your Todos are from cases where you have been assigned a Todo by either yourself or a team member. If you know you have accomplished a Todo already, feel free to check it off in the Work tab and the case will autoupdate.
The Cases Tab
→ Watch a video tutorial on Working with Cases
How do I create a new case from the Cases tab?
Easily! First click on the inviting + button on the Cases tab.

This will open a mini case editor so you can enter all the juicy details!

How do I add team members, notes, files and to-do’s to a case?
Each of these additions to a case are super easy to add! Let’s take a look at where these options are located within a case:
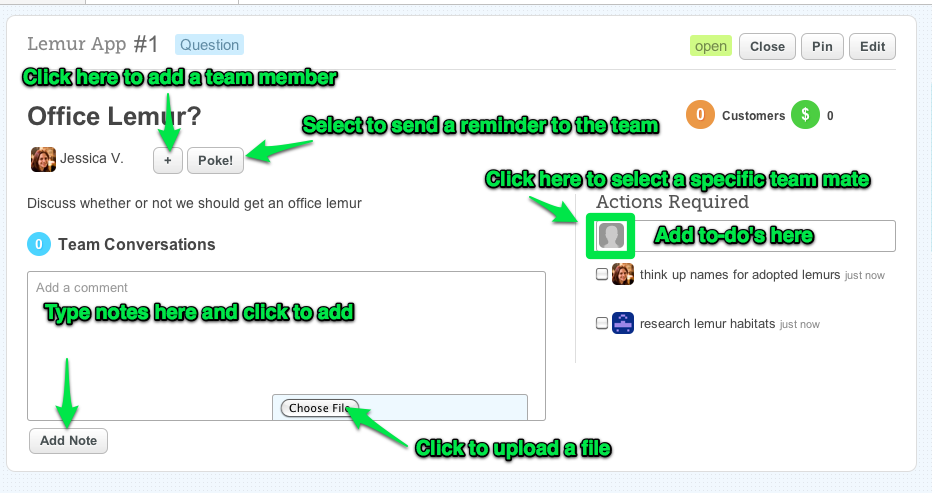
Hey, wait, what about those other buttons! Pin? What’s that?
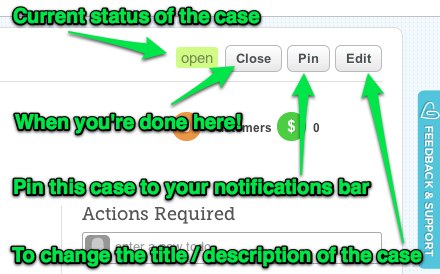
When you pin a case it puts a small reminder up at the top of the screen in your notifications bar. This way you know this case needs your attention!
Can I search or filter cases? By channel, case type, or team member?
You sure can! You can search, sort, filter and look at cases by any or several of these options!
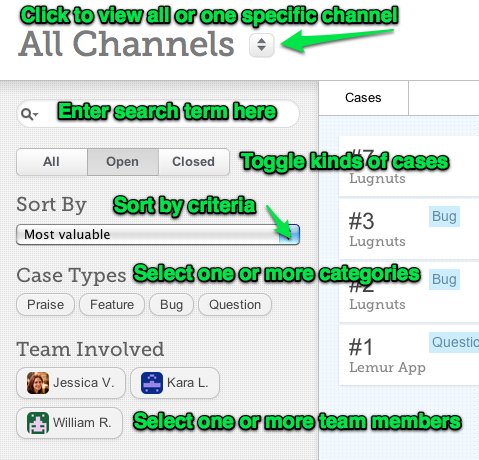
You can use the options to filter down to specific types of cases, categories or ones assigned to a team member. You can also sort the cases based on critters such as title, most customer, most valuable, and newest. These filters give you a ton of information at your fingertips and help you decide what to work on, or check out cases that are specifically assigned to you. You can use some, all or none of these filters depending on what information you are looking for.